Furnace Carriage Kit Creation: Difference between revisions
No edit summary |
No edit summary |
||
| Line 3: | Line 3: | ||
|about=Furnace_Carriage_Kit | |about=Furnace_Carriage_Kit | ||
|product=furnace+carriage+kit}} | |product=furnace+carriage+kit}} | ||
== Instructions == | |||
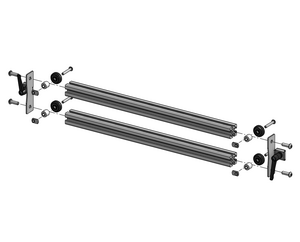
[[File:Furnace carriage kit exploded.png|alt=Furnace carriage kit exploded|thumb|Furnace carriage kit exploded]] | [[File:Furnace carriage kit exploded.png|alt=Furnace carriage kit exploded|thumb|Furnace carriage kit exploded]] | ||
# Prepare the components | |||
#: Ensure all necessary components are on hand, including the V-wheel bars, 8020 sliding locks, carriage end plates, screws (1/4-20 x 3/4 BH SS), and T-nuts | |||
# Insert t-nuts into the bars | |||
#: Insert the required t-nuts into the 8020 struts, ensuring they are evenly distributed according to the number of furnaces that will be mounted. (This step involves setting up the installation of the CCQF and CCSF kits) | |||
# | # Position the t-nuts | ||
# | #: slide in two 10-32 offset stainless steel t-nuts into each end of the 8020 bars. Position there t-nuts on the same side of the bars | ||
# | # Assemble the carriage end plates | ||
# | #: On a flat surface, position the 8020 bars so that they are aligned correctly. Attach the carriage end plates to both ends of the 8020 bars, ensuring that the tabbed side of the end plates is on the same side as the offset t-nuts | ||
# | #: Secure the carriage end plates to the 8020 bars using the screws (1/4-20 x 3/4 BH SS). Ensure the entire assembly remains flat, and the 8020 bars are properly aligned without any rotation | ||
# | # Attach V-wheel components | ||
# | #: Attach the V-wheel spacer and V-slot wheel (24 x 5 mm) to the 10-32 offset stainless steel t-nuts on the struts. Ensure the wheels are securely fastened and aligned for smooth vertical movement. | ||
# Attach the 8020 sliding locks | |||
# Attach the | #: Finally, assemble the 8020 sliding lock onto the carriage end plates, ensuring it is properly secured and functional | ||
# Final inspection | |||
# | #: Verify that all components are tightly secured and aligned. The completed assembly should be stable, with the 8020 bars parallel and the carriage end plates securely fastened. | ||
Latest revision as of 13:36, 15 August 2024
Instructions

- Prepare the components
- Ensure all necessary components are on hand, including the V-wheel bars, 8020 sliding locks, carriage end plates, screws (1/4-20 x 3/4 BH SS), and T-nuts
- Insert t-nuts into the bars
- Insert the required t-nuts into the 8020 struts, ensuring they are evenly distributed according to the number of furnaces that will be mounted. (This step involves setting up the installation of the CCQF and CCSF kits)
- Position the t-nuts
- slide in two 10-32 offset stainless steel t-nuts into each end of the 8020 bars. Position there t-nuts on the same side of the bars
- Assemble the carriage end plates
- On a flat surface, position the 8020 bars so that they are aligned correctly. Attach the carriage end plates to both ends of the 8020 bars, ensuring that the tabbed side of the end plates is on the same side as the offset t-nuts
- Secure the carriage end plates to the 8020 bars using the screws (1/4-20 x 3/4 BH SS). Ensure the entire assembly remains flat, and the 8020 bars are properly aligned without any rotation
- Attach V-wheel components
- Attach the V-wheel spacer and V-slot wheel (24 x 5 mm) to the 10-32 offset stainless steel t-nuts on the struts. Ensure the wheels are securely fastened and aligned for smooth vertical movement.
- Attach the 8020 sliding locks
- Finally, assemble the 8020 sliding lock onto the carriage end plates, ensuring it is properly secured and functional
- Final inspection
- Verify that all components are tightly secured and aligned. The completed assembly should be stable, with the 8020 bars parallel and the carriage end plates securely fastened.