Furnace Carriage Kit Creation: Difference between revisions
No edit summary |
No edit summary |
||
| Line 3: | Line 3: | ||
|about=Furnace_Carriage_Kit | |about=Furnace_Carriage_Kit | ||
|product=furnace+carriage+kit}} | |product=furnace+carriage+kit}} | ||
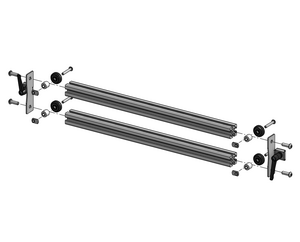
[[File:Furnace carriage kit exploded.png|alt=Furnace carriage kit exploded|thumb|Furnace carriage kit exploded]] | |||
=== Instructions === | === Instructions === | ||
Revision as of 12:27, 15 August 2024

Instructions
- Refer to the model to determine the number of furnaces.
- Insert all 8-32 t-nuts into the 8020 strut.
- Slide in a 10-32 offset SS t-nut, two per 8020 bar, on each end.
- The short end goes on the outside.
- Using a flat surface, attach the carriage end plate to both sides of the 8020 stock with the tabbed side on the same side as the offset t-nuts.
- Screw the carriage end plates in and confirm that the assembly is flat and the 8020 bars are not rotated in place.
- Assemble and attach the v-wheels to the offset t-nuts.
- Leave these loose so that they can be positioned.
- Attach the carriage to the CEGS frame using an 8020 sliding lock.
- Do not forget to install the carriage stops above and below the slide lock.
- Check that when the slide lock is tightened the metal tab of the carriage end plate does not make contact with the metal of the CEGS frame.