Actuator Frame Bearing 4LFV Creation: Difference between revisions

From Aeon HACS Wiki
(Added instruction info, markup lang, link nav bar, updated 3d model and product info links; about this item still pending)
 
No edit summary
 
(8 intermediate revisions by 3 users not shown)
Line 1: Line 1:
<div style="text-align: right;">[https://cad.onshape.com/documents/a2590672ece11180cd4d60d0/w/180034e6f61eac6669ee5961/e/fd81fdd961f4753b6f3e5375?configuration=List_zyUFl3MfesMyez%3DDefault&renderMode=0&uiState=65be73815b8b636a5e37c83a 3D Model]&nbsp;&nbsp;&nbsp;&nbsp;[SUMMARYPG About this item]&nbsp;&nbsp;&nbsp;&nbsp;[https://www.aeonlaboratories.com/?page=products&item=actuator+frame+bearing+4LFV Product info]</div>
{{Item navbar
----
|model=https://cad.onshape.com/documents/a2590672ece11180cd4d60d0/w/180034e6f61eac6669ee5961/e/fd81fdd961f4753b6f3e5375?configuration=List_zyUFl3MfesMyez%3DDefault&renderMode=0&uiState=65be73815b8b636a5e37c83a
# Setup the MV35 so that it will hold the actuator frame bearing.
|about=Actuator_Frame_Bearing_4LFV
# Grab an actuator bearing blank and place it into the setup.
|product=actuator+frame+bearing+4LFV}}
# Run the program.
 
#* It is most efficient to do the same step on multiple blanks then move onto a different step.
== Instructions ==
# Run all of the programs required to turn the blank into the needed part
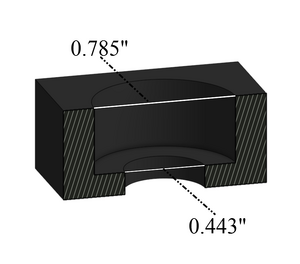
[[File:Actuator frame bearing 4LFV exploded.png|alt=piece of plastic in half|thumb|Actuator frame bearing 4LFV]]
# This part is milled in the MV35, follow the instructions within the program.
# Drill a 0.443 inch hole on the top of the bearing.
# Drill a 0.785 inch hole on the top (Do not go all the way through).
 
=== Notes: ===
* Follow the model to find the correct position.

Latest revision as of 15:26, 25 July 2024

    3D Model    About this item    Product info

Instructions

piece of plastic in half
Actuator frame bearing 4LFV
  1. This part is milled in the MV35, follow the instructions within the program.
  2. Drill a 0.443 inch hole on the top of the bearing.
  3. Drill a 0.785 inch hole on the top (Do not go all the way through).

Notes:

  • Follow the model to find the correct position.