Actuator LN Valve Creation: Difference between revisions
(added about this item link to nav bar) |
No edit summary |
||
| (5 intermediate revisions by 2 users not shown) | |||
| Line 1: | Line 1: | ||
{{Item navbar | |||
|model=https://cad.onshape.com/documents/a2590672ece11180cd4d60d0/w/180034e6f61eac6669ee5961/e/94905bfcc81be7dcf257d095?configuration=default&renderMode=0&uiState=65be8490a5f64c01ea3b909e | |||
|about=Actuator_LN_Valve | |||
|product=actuator+LN+valve}} | |||
== Instructions == | |||
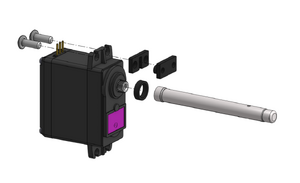
[[File:Actuator LN valve exploded (onshape).png|alt=Actuator LN valve exploded|thumb|Actuator LN valve exploded]] | |||
# Open the serial port terminal. | # Open the serial port terminal. | ||
# Plug the test actuator controller into | #: Ensure the serial port terminal is open on your computer. | ||
# | # Connect the Test Actuator Controller. | ||
# Command g1000. | #: Plug the test actuator controller into the computer. | ||
# Connect the servo. | |||
#: Attach the CPW servo to the controller. | |||
# Command the servo. | |||
#: Enter the command 'g1000' in the terminal to initialize the servo. | |||
# Disconnect the servo. | # Disconnect the servo. | ||
# Install | #: Safely disconnect the servo from the controller. | ||
# Install | # Install the LN valve stem | ||
# | #: Attach the LN valve stem onto the servo drive spline, ensuring the orientation mark is facing the servo label. | ||
# Install the LN valve stem collar | |||
#: Place the LN valve stem collar onto the valve stem with the chamfered ID first. | |||
# Secure the collar | |||
#: using the collar pusher tool (TL-LNVSCP), press the collar down into contact with the servo gear cover. | |||
=== Notes: === | |||
* Do not assemble the screws and servo T-nut onto the valve at this stage. These will be assembled during the LN manifold assembly process. | |||
Latest revision as of 11:39, 26 July 2024
Instructions

- Open the serial port terminal.
- Ensure the serial port terminal is open on your computer.
- Connect the Test Actuator Controller.
- Plug the test actuator controller into the computer.
- Connect the servo.
- Attach the CPW servo to the controller.
- Command the servo.
- Enter the command 'g1000' in the terminal to initialize the servo.
- Disconnect the servo.
- Safely disconnect the servo from the controller.
- Install the LN valve stem
- Attach the LN valve stem onto the servo drive spline, ensuring the orientation mark is facing the servo label.
- Install the LN valve stem collar
- Place the LN valve stem collar onto the valve stem with the chamfered ID first.
- Secure the collar
- using the collar pusher tool (TL-LNVSCP), press the collar down into contact with the servo gear cover.
Notes:
- Do not assemble the screws and servo T-nut onto the valve at this stage. These will be assembled during the LN manifold assembly process.